
Building a simple window box planter is easy when you plan carefully. Start by measuring your window space to determine the size. Gather weather-resistant materials like cedar or pressure-treated lumber, and gather tools such as a saw, drill, and screws. Cut your pieces precisely, assemble the box with waterproof glue and fasteners, and drill drainage holes for water flow. Finish with paint or stain, then securely attach it to your window. For detailed steps, keep exploring further.
Key Takeaways
- Measure window space accurately to determine the appropriate size and depth of your planter.
- Select durable, weather-resistant materials like cedar or PVC for easy maintenance and longevity.
- Cut all wood pieces precisely using a miter saw, ensuring proper angles for a clean, professional fit.
- Assemble the planter securely with waterproof glue and screws, paying attention to proper alignment and stability.
- Drill drainage holes, fill with soil, and add plants, ensuring proper watering and drainage for healthy growth.

iGarden Robotic Pool Cleaner K Series, Cordless Pool Vacuum Robot for Inground & Above Ground Pools, Smart Navigation, Touchscreen, Self-Parking, Cleans Floor, Wall & Waterline, 150 Min
Robust Cleaning Capability: Engineered with a turbine-grade impeller, an optimized flow system, and 3 brushless motors, the cordless...
As an affiliate, we earn on qualifying purchases.
Planning Your Window Box Project
Before you start building your window box, it’s important to plan carefully. Measure the width of your window to determine the right length for your planter, aiming for a balanced look.
Decide on the height and depth based on the plants you want to grow and the space available outside your window. Choose durable materials like cedar, PVC, or pressure-treated lumber to handle outdoor weather.
When it’s time to assemble, gather your tools, including a drill, which you’ll need to create drainage holes in the bottom of the box. A drill allows you to make precise holes to prevent water damage and promote healthy plant growth.
Understanding necessary cookies helps ensure your project setup is secure and functional. Planning ahead guarantees your window box is functional, attractive, and built to last. Proper gumball machine placement can also influence how well your plants thrive by providing easy access and good visibility.
Additionally, considering AI security measures can help protect your garden setup from potential environmental threats or pests, ensuring a safer environment for your plants. Incorporating weather-resistant materials during your planning will further extend the longevity of your window box.

(2026 Upgrade) WYBOT C1 Cordless Robotic Pool Vacuum for Inground Pools, Above Ground Pool Cleaner 4-in-1 Wall & Waterline Cleaning Up to 1,614sq.ft, 150mins Smart Navigation, App Support
Powerful Suction with Dual Brushes: Built with an upgraded independent water pump motor delivering up to 3,038 GPH...
As an affiliate, we earn on qualifying purchases.
Gathering Necessary Tools and Materials
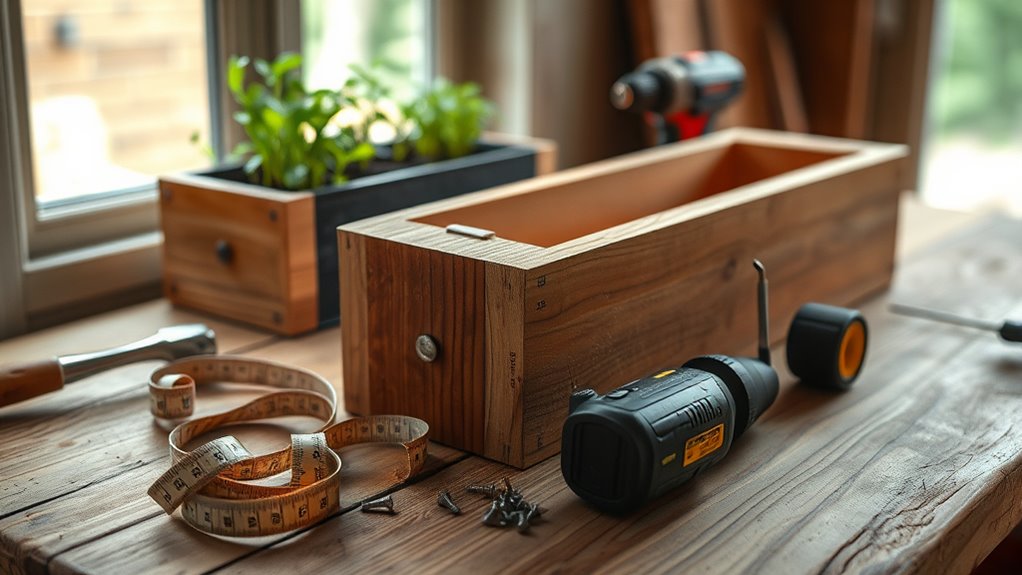
To guarantee your window box project goes smoothly, gather all the necessary tools and materials beforehand. Having everything ready reduces delays and keeps your work organized. Essential tools include a miter saw, drill, tape measure, hammer, and clamps for precise cuts and secure assembly. For materials, choose weather-resistant options like pressure-treated lumber, cedar, or PVC to ensure durability. Don’t forget fasteners such as screws, nails, and lag bolts, along with wood glue for extra strength. Safety equipment like goggles and ear protection are vital to avoid injuries. Proper planning contributes to a more efficient Mazda Tuning process and prevents interruptions during assembly. Being aware of automation in business can help you incorporate innovative tools to streamline your work. Incorporating ergonomic techniques can also reduce fatigue and improve accuracy during assembly. Use the table below to help organize your tools and materials:
| Tools | Materials | Safety Equipment |
|---|---|---|
| Miter saw | Pressure-treated lumber | Goggles |
| Drill | Cedar or PVC | Ear protection |
| Tape measure | Screws, nails, bolts | |
| Hammer | Wood glue |
| Clamps

WYBOT C1 Cordless Robotic Pool Vacuum for Inground Pools, Above Ground Pool Cleaner 4-in-1 Wall & Waterline Cleaning Up to 1,614sq.ft, 150mins Smart Navigation, App Support
Powerful Suction with Dual Brushes: Built with an upgraded independent water pump motor delivering up to 3,038 GPH...
As an affiliate, we earn on qualifying purchases.
Measuring and Marking Your Wood Pieces
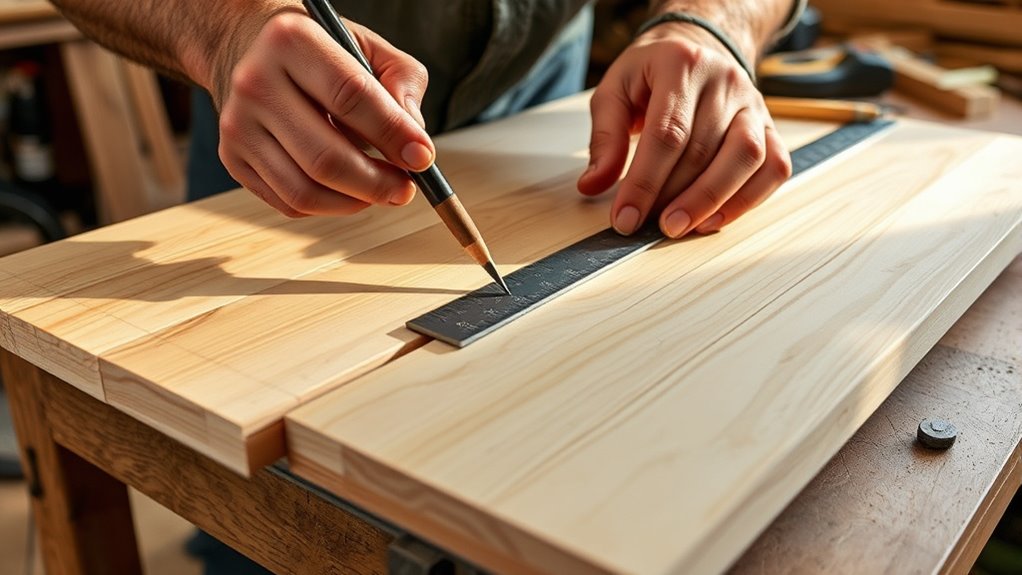
Start by measuring each wood piece carefully with a tape measure, and write down your measurements before marking. Use a square or straight edge to draw clean, straight lines along your marks for accurate cuts. Double-check all measurements and marks before cutting to guarantee your pieces fit together perfectly during assembly. Incorporating precise measurement techniques can help ensure your planter turns out just right. Paying close attention to accurate measurement practices also helps prevent errors that could compromise your project’s stability. Utilizing proper measurement tools can further improve the accuracy of your cuts and assembly. Being aware of measurement accuracy is essential to achieving a professional-looking result, especially when working with material dimensions to ensure proper fit.
Accurate Measurement Techniques
Accurate measurement is essential for ensuring your window box fits together properly and looks professional. To achieve measurement accuracy, use a reliable tape measure and double-check each measurement before cutting. Always measure from the same starting point, like the edge of the wood, to maintain consistency. Mark cut lines clearly with a pencil, using a square or straightedge to keep lines straight and precise. When cutting at angles, account for the bevel by adjusting your measurements accordingly, adding or subtracting as needed. After marking your pieces, verify each measurement once more to catch any errors before making cuts. Proper measurement techniques ensure your project turns out as planned and reduce material waste. Precise measurement helps prevent mistakes that could affect the fit and overall appearance of your window box, making the building process smoother and more successful. Additionally, understanding measurement accuracy can help you troubleshoot potential issues early in the project. Incorporating lifestyle principles such as organized workspace and clear planning can also contribute to more accurate and efficient measurements. Being aware of security considerations in your workspace can further help protect your tools and materials during the building process. Utilizing specialized tools, like a square or marking gauge, can further improve your measurement precision.
Marking for Precision
Proper marking is essential for ensuring your wood pieces fit together precisely. To do this effectively, follow these steps:
- Use a tape measure to accurately measure each piece’s length, then mark the spot with a pencil.
- Always measure from the same starting point and double-check your measurements before marking.
- Draw clear, straight lines using a square or straight edge to mark cut lines accurately.
- For multiple identical pieces, trace around a template or use a jig to maintain consistency.
- Understanding the self watering plant pots mechanism can help you plan the dimensions for your planter to ensure proper water retention and plant health. Incorporating auditory processing techniques into your planning can also aid in developing a better sense of spatial awareness and measurement accuracy. Additionally, utilizing AI-powered data analytics can optimize your measurements and planning process, reducing errors and saving time.
For angled cuts, measure and mark the angles carefully, and use a protractor or miter saw for precise lines.
Accurate measuring and marking set the foundation for a perfect fit in your window box planter.

iGarden Robotic Pool Cleaner K Series, Cordless Pool Vacuum Robot for Inground & Above Ground Pools, Smart Navigation, Touchscreen, Self-Parking, Cleans Floor, Wall & Waterline, 220 Min
Robust Cleaning Capability: Engineered with a turbine-grade impeller, an optimized flow system, and 3 brushless motors, the cordless...
As an affiliate, we earn on qualifying purchases.
Cutting the Sides and Bottom of the Box
To guarantee your window box fits together perfectly, you need to cut the sides and bottom with accurate angles and consistent dimensions. Use a miter saw set to 15° to make clean beveled cuts, and double-check your measurements before cutting. Maintaining precision at this stage will make assembly much easier and result in a professional-looking planter. Attention to detail is essential to ensure the proper assembly of your window box. Additionally, practicing precise measurements and cuts can improve your overall workflow, which is crucial when working with diverse designs and materials like ceramic or recycled products, leading to more successful projects.
Accurate Angle Cuts
When cutting the sides and bottom of your window box, it’s essential to make precise 15° bevels to guarantee a perfect fit. Accurate angle cuts depend on careful measurements and proper tools. Here’s what you should do:
- Use a miter saw or circular saw with a protractor to set exact 15° angles for your cuts.
- Measure 22 inches from the long point of the board and mark it for the bottom and end pieces.
- Cut the end pieces at 5 inches with parallel beveled edges to match the sides.
- Double-check all measurements and angles before making each cut to ensure consistency.
Sanding the edges afterward will smooth roughness, making your joints clean and snug.
Accurate angle cuts are key to a professional-looking planter.
Measure End Bevels
Measure 22 inches along the long edge of each board to identify where you’ll cut the end bevels for the sides and bottom of your window box. This measurement sets the length for your bevel cuts.
Next, mark a 15° bevel on each end of the board, ensuring consistency on both sides. Use a miter saw set to 15° or a circular saw with a protractor to accurately cut along your marked lines.
The bevels should be parallel and properly aligned to create a tight fit when assembling the box. After cutting, double-check that the bevels are symmetrical and smooth.
Remove any splinters or rough edges with sandpaper for a clean, professional finish. Properly measuring and beveling your boards now guarantees a sturdy, well-constructed window box.
Maintain Consistent Dimensions
Before cutting the sides and bottom of your window box, double-check that your measurements are accurate and consistent. Proper dimensions are key to a sturdy, well-fitting planter.
Here’s what to do:
- Measure the length of each side and bottom carefully, aiming for roughly 24 inches for a standard box.
- Mark cut lines clearly on the wood, ensuring the measurement is precise.
- Use a saw with a protractor to cut the sides at a 15° angle if needed, maintaining the correct measurement.
- Cut all side pieces and the bottom to the same length, verifying each measurement before proceeding.
Double-check your measurements before cutting, and sand rough edges to ensure a precise fit and smooth finish.
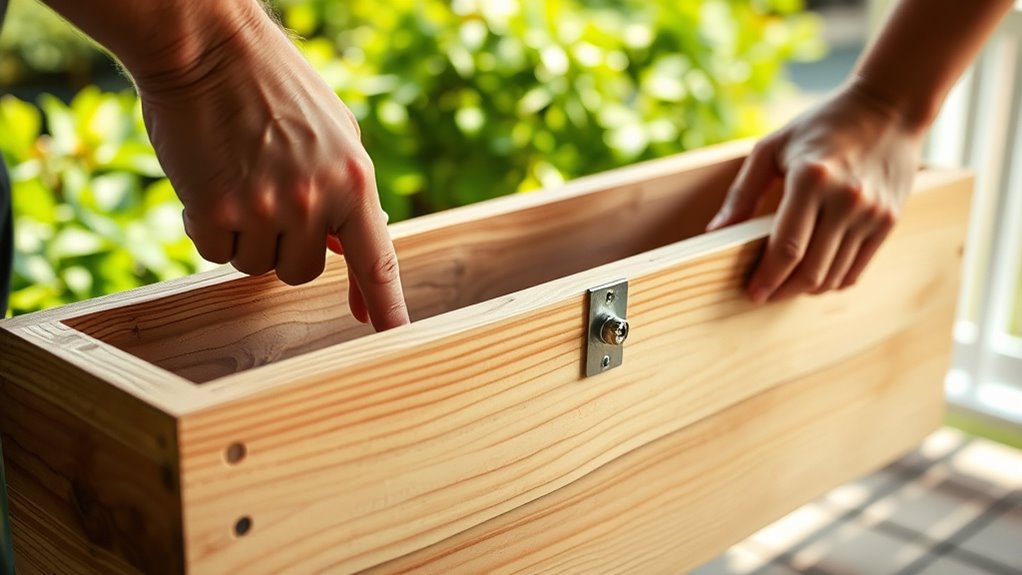
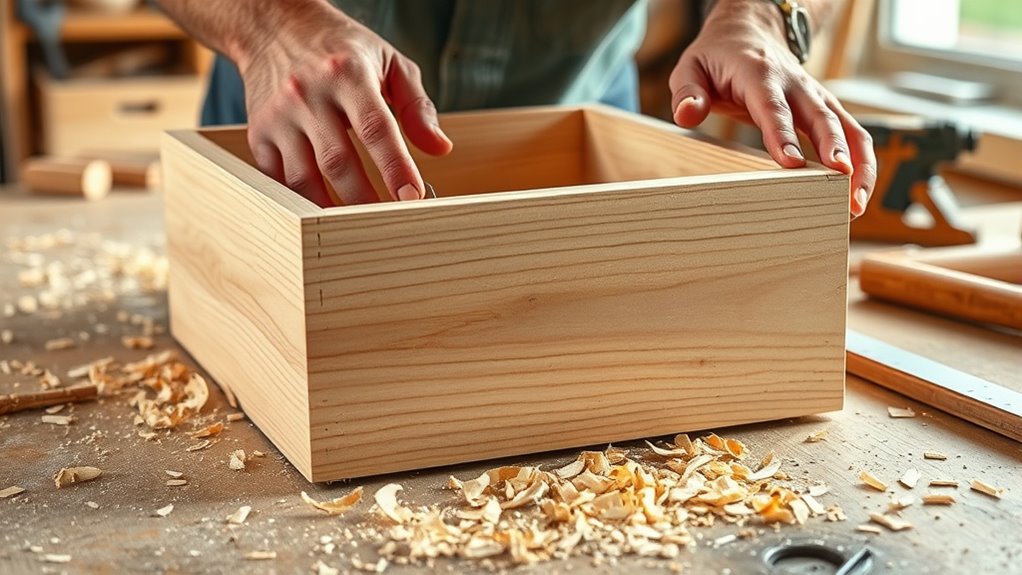
Assembling the Main Structure
To assemble the main structure of your window box, start by fitting the side panels to the bottom piece, guaranteeing all edges are aligned precisely. Once positioned, drill pilot holes in each piece to prevent splitting. Apply waterproof wood glue to the edges where the sides meet the bottom, then secure them with 2-inch screws, carefully tightening each. Attach the end pieces to the assembled sides, making sure beveled edges align for a seamless look. Use a combination of screws and glue to strengthen the joints. Here’s a quick overview:
| Step | Action |
|---|---|
| 1 | Fit side panels to the bottom piece |
| 2 | Drill pilot holes |
| 3 | Assemble sides with glue and screws |
| 4 | Secure end pieces for stability |
This process ensures a sturdy, well-assembled main structure.
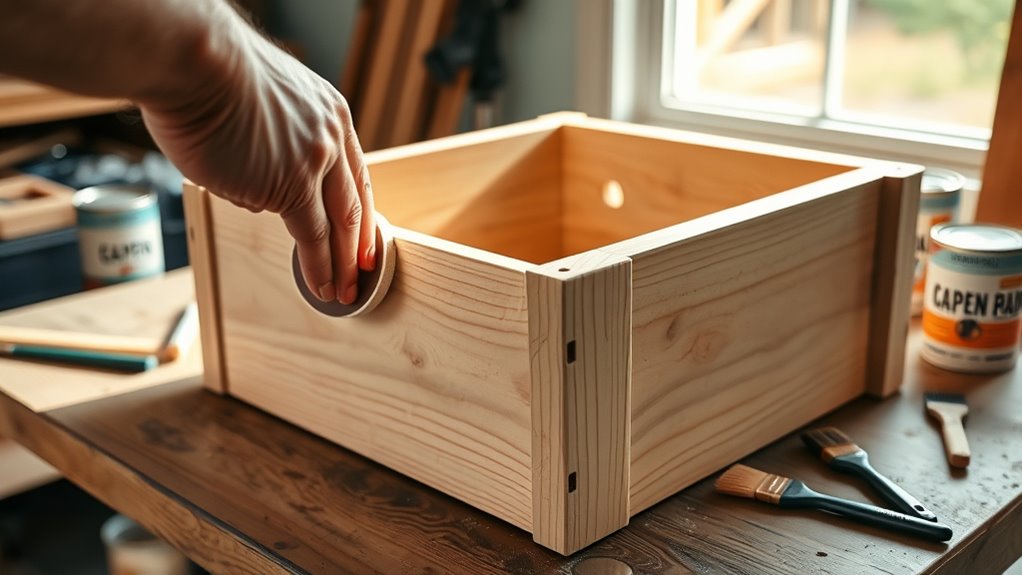
Adding Decorative Trim and Finishing Touches
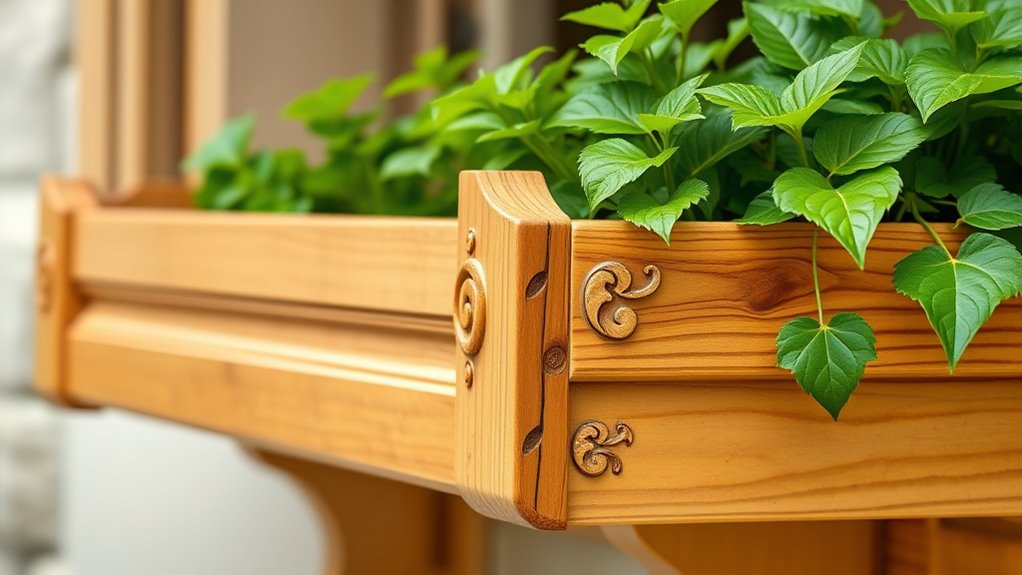
Choosing the right decorative trim can really enhance your window box’s look. So pick a style that complements your home.
When attaching the trim, use finish nails or screws carefully to guarantee a secure, neat finish.
Sand the edges afterward to create a smooth, professional appearance that lasts.
Choosing Decorative Trim Styles
Adding decorative trim to your window box can instantly elevate its appearance, giving it a polished and cohesive look. When choosing trim styles, consider how they complement your home’s architecture and your personal style. Here are some options to consider:
- Use a miter saw to cut trim at 45-degree angles for clean, professional corners.
- Ripping trim to specific widths allows for custom detailing that enhances your design.
- Attach crown moulding or cove moulding along the top or bottom edges for added visual interest.
- Paint or stain the trim in a contrasting color to highlight the design or match your exterior palette.
Securing the trim with finishing nails or adhesive ensures durability and a seamless finish.
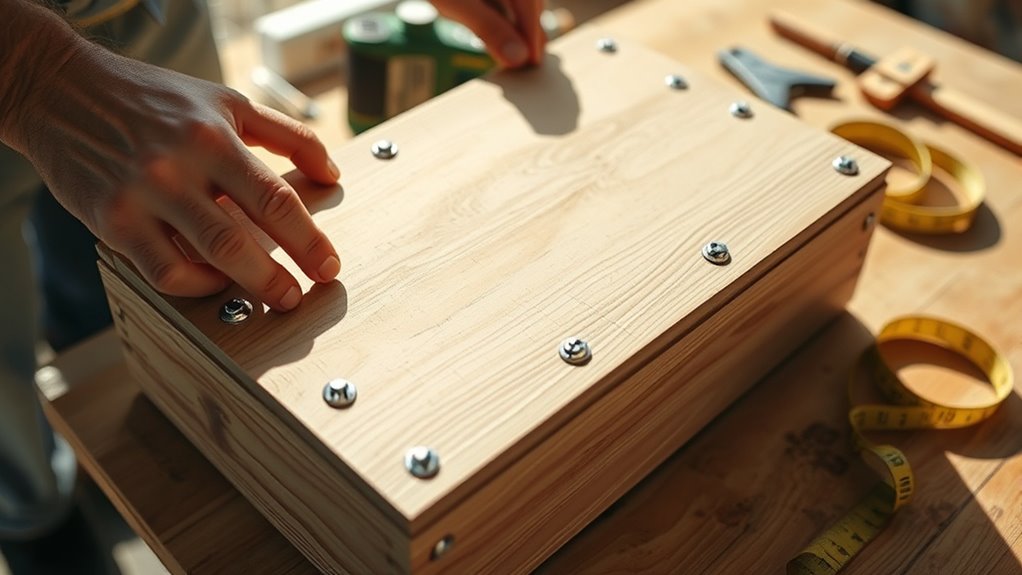
Applying Finishing Nails Properly
Securing your decorative trim with finishing nails is the key to guaranteeing it stays in place and looks polished. Use a hammer or finish nailer to drive nails at a 45-degree angle for a secure finish.
To prevent wood splitting, pre-drill small pilot holes before inserting nails. Space the nails about 6 to 8 inches apart along the trim for even fastening and a neat appearance.
Countersink the nails slightly below the surface, then fill the holes with wood putty to create a smooth, finished look. After the putty dries, sand over the nail heads and filled areas to achieve a seamless, professional finish.
Properly applying finishing nails ensures your window box planter has a clean, attractive appearance that lasts.
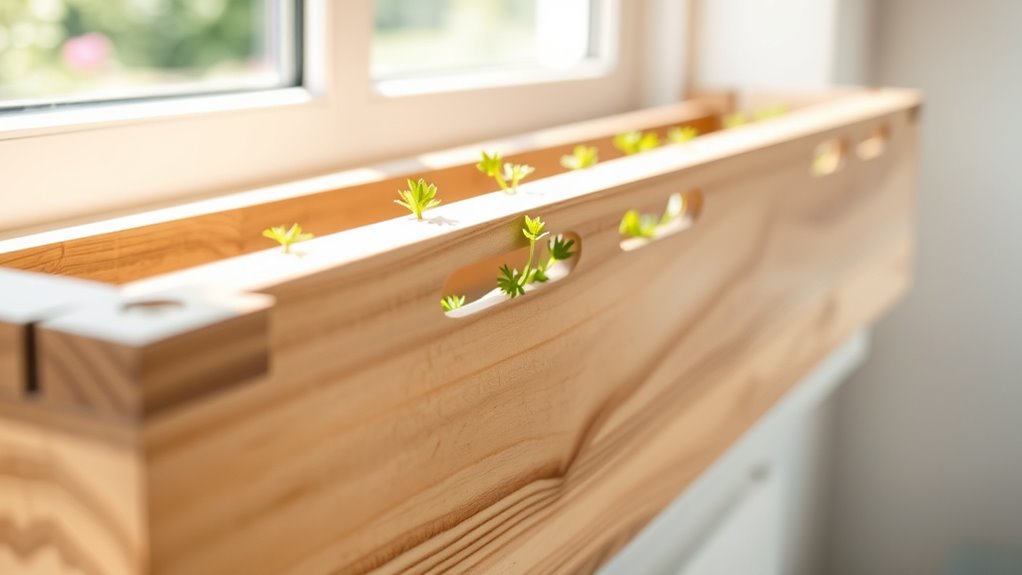
Drilling Drainage Holes for Water Management
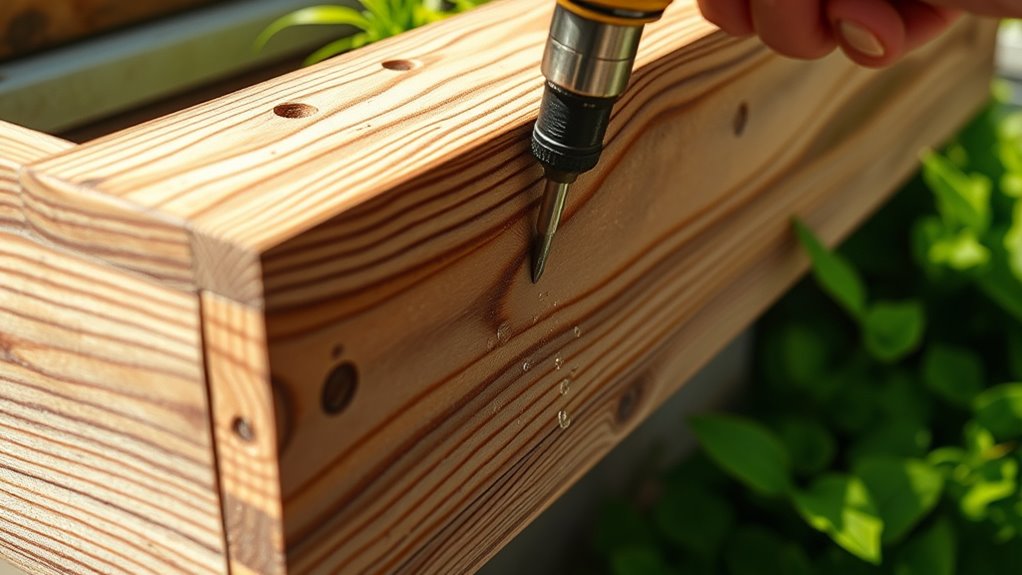
To guarantee proper water drainage and prevent root rot, drilling drainage holes in the bottom of your window box is essential. These drainage holes are vital for effective water management, ensuring excess water escapes and roots stay healthy.
Here are key tips:
- Use a 1/2-inch drill bit to create multiple drainage holes for optimal water flow.
- Space the holes evenly, about 1 to 2 inches from the edges, to distribute water efficiently.
- Mark the spots beforehand to avoid splitting the material or drilling in the wrong places.
- Drill with a steady hand and wear safety goggles to protect your eyes from debris.
Painting or Staining the Completed Box
Before applying paint or stain to your finished window box, it’s important to prepare the surface properly. Start by applying an exterior primer to improve adhesion and enhance durability.
Begin with an exterior primer to boost adhesion and ensure lasting durability.
Choose weather-resistant paint or stain formulated for outdoor use to prevent fading, peeling, and damage from the elements.
When applying, use multiple thin coats, allowing enough drying time between each for a smooth, even finish.
After the final coat, finish with a clear sealant or topcoat designed for outdoor wood to add extra protection against moisture and UV rays.
Once the finish is complete, let it cure fully—typically 24 to 48 hours—before exposing your window box to outdoor conditions.
Proper preparation ensures your paint or stain lasts longer and keeps your planter looking fresh.
Attaching the Window Box to Your House
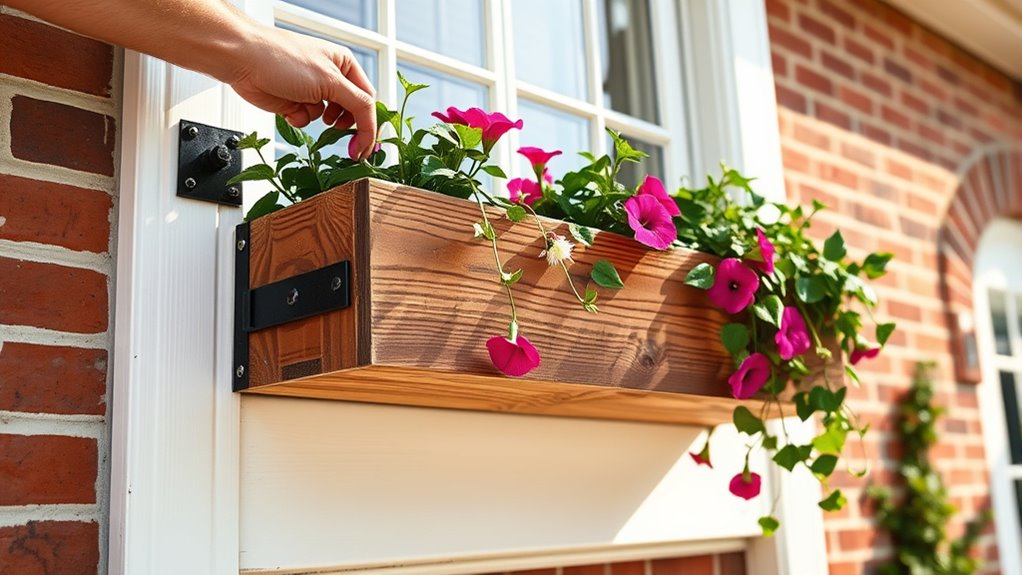
Have you considered how to guarantee your window box stays firmly attached? To assure secure mounting, follow these steps:
- Use a level to mark a straight, horizontal line aligned with the top edge of the window box.
- Find and mark wall stud locations with a stud finder or tap for secure attachment points.
- Drill pilot holes through the mounting brackets or cleat at the marked stud positions, using a masonry bit if attaching to brick or concrete.
- Insert lag bolts with washers through the brackets into the studs or wall anchors for a secure hold.
Finally, seal around the screw heads with exterior silicone sealant to prevent water infiltration and protect your wall. Proper mounting guarantees your window box remains stable and secure.
Preparing the Planter for Planting and Maintenance
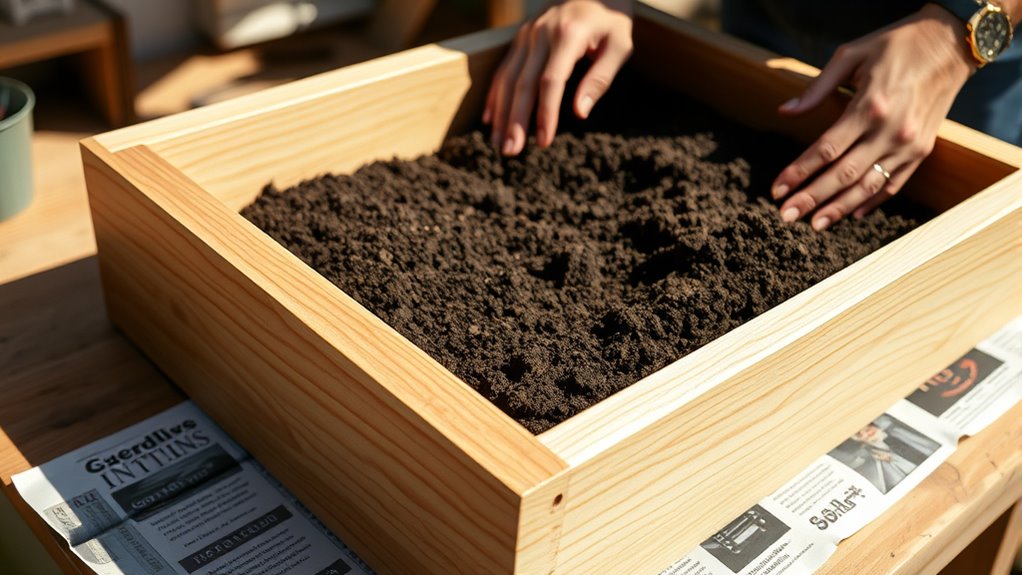
Preparing your window box for planting begins with filling it with lightweight, high-quality potting soil. Before adding soil, drill holes in the bottom of the box to guarantee proper drainage. Make sure these holes are unobstructed, and place a layer of rocks or gravel beneath the soil to prevent water from pooling.
This setup helps avoid waterlogging and keeps roots healthy. Fill the box with soil up to a few inches below the rim, leaving space for watering.
Regularly check soil moisture levels to prevent overwatering or drought stress, especially in hot weather. Periodically inspect the planter for signs of rot, mold, or damage, and repair or replace it as needed. Proper preparation ensures your window box remains vibrant and easy to maintain.
Frequently Asked Questions
How to Plant a Window Box for Beginners?
To plant a window box for beginners, start by choosing the right plants for your sunlight conditions.
Fill the box with lightweight, well-draining soil, and add a layer of gravel at the bottom for drainage.
Plant your flowers or herbs at the same depth they were in their containers, giving them space to grow.
Water regularly and fertilize every few weeks to keep your plants healthy and vibrant.
What Do You Put in the Bottom of a Window Box for Drainage?
You should add a drainage layer at the bottom of your window box to prevent waterlogging. Use gravel, broken pottery shards, or small stones to create this layer, which helps excess water escape.
Cover it with a landscape fabric or mesh to keep soil from washing out. This setup guarantees proper drainage, protects plant roots, and promotes healthy growth by preventing root rot.
What Is the Best Wood for a Window Flower Box?
Choosing the best wood for your window flower box is like picking a reliable friend—you want durability and beauty. Cedar stands out because it naturally resists rot and decay, making it ideal for outdoor use.
Pressure-treated lumber is durable but needs sealing to protect your plants. Vinyl and PVC are maintenance-free but lack the natural look. For a classic, long-lasting choice, cedar is your best bet.
How Many Plants Should Be in a Window Box?
You’re wondering how many plants to put in your window box. Typically, a 24-inch box can hold 3 to 5 small or medium plants comfortably.
For a lush look, plant 4 to 6 per foot of the box’s length, but leave 2 to 3 inches between each to prevent overcrowding.
Choose plants with similar sunlight and water needs for healthy, uniform growth.
Conclusion
Now, your window box is ready to bloom, a vibrant splash of life against your home’s façade. As you step back, admire the sturdy wood and fresh paint, a tribute to your effort. Just like the plants that will thrive inside, your project blends craftsmanship with nature’s beauty. With each flower you nurture, your simple box transforms from raw materials into a charming, living window display—proof that patience and creativity truly blossom.