
A DIY Arduino climate controller lets you create an affordable, customized system to monitor and automate your greenhouse environment. By choosing well-calibrated sensors for temperature, humidity, and light, you can guarantee accurate data collection. Program your Arduino to respond to these readings by activating heaters, fans, or solar heating, improving plant growth and saving energy. For more tips on building and optimizing your system, keep exploring how sensor calibration and solar integration make it all work seamlessly.
Key Takeaways
- Use well-calibrated sensors for temperature, humidity, and light to ensure accurate climate data.
- Connect sensors to Arduino and program it to automate heating, cooling, and ventilation based on sensor thresholds.
- Incorporate solar heating controls to utilize renewable energy, reducing reliance on electric heaters and lowering costs.
- Regularly calibrate sensors to maintain accuracy, accounting for environmental factors like dust and humidity.
- Optimize system performance by understanding local sunlight patterns and ensuring proper sensor placement for reliable readings.
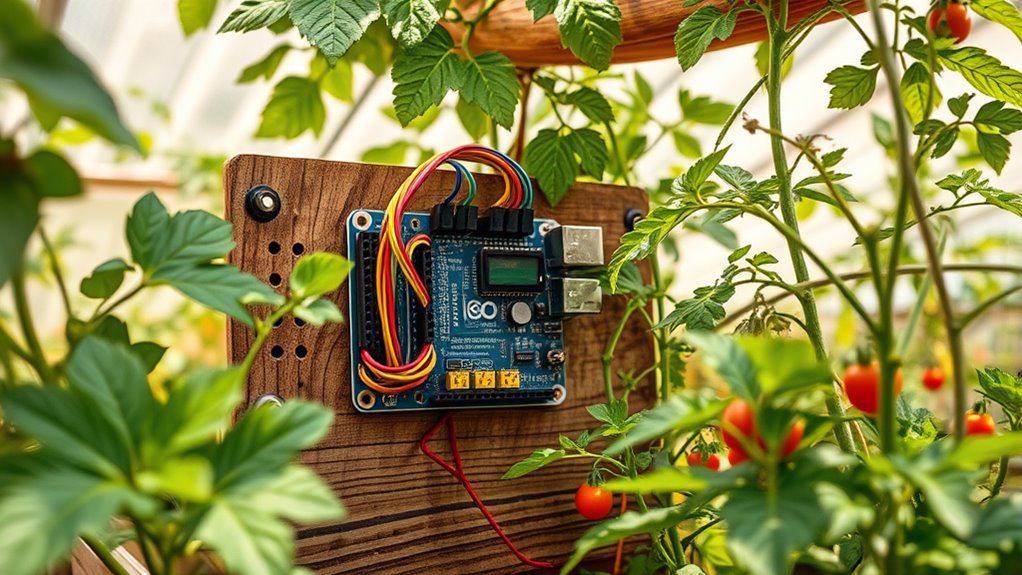
Have you ever wondered how technology is transforming greenhouse farming? With DIY Arduino climate controllers, you can take your greenhouse management to the next level, making it more efficient and responsive. One of the key aspects of building an effective system is guaranteeing accurate sensor calibration. When sensors are properly calibrated, they provide reliable data on temperature, humidity, and light levels, allowing your controller to make precise adjustments. Faulty sensors can lead to incorrect readings, causing your climate control to overheat or cool unnecessarily, wasting energy and potentially harming your plants. Regularly calibrating your sensors guarantees consistent performance and helps you fine-tune your system for ideal plant growth.
Proper sensor calibration ensures reliable greenhouse data and optimal climate control.
Another crucial component of greenhouse tech is harnessing solar heating. This renewable energy source can markedly reduce your reliance on electric heaters, lowering costs while maintaining a stable environment. By integrating solar heating into your Arduino climate controller, you can automate the activation of solar collectors or passive heating methods when sunlight is abundant. This setup works well in tandem with sensors that monitor ambient temperature, triggering solar heating systems only when needed. Properly managing solar heating also involves understanding the dynamics of heat retention and dissipation within your greenhouse, which can be refined through thoughtful design and sensor placement.
To build your DIY system, start by selecting appropriate sensors and guaranteeing they are calibrated correctly. Use calibration procedures recommended by manufacturers or compare readings against a trusted reference device. Once your sensors are accurate, connect them to your Arduino board, which acts as the central controller. Program your Arduino to read sensor data continuously and make decisions based on predefined thresholds. For instance, if the temperature drops below a certain point, your system can activate a heater, or if it rises too high, it can turn on ventilation fans. Incorporate solar heating controls so that when sunlight is sufficient, the system prioritizes passive heating, reducing energy consumption.
Keep in mind that sensor calibration isn’t a one-time task; it’s an ongoing process to maintain precision over time. Environmental factors like dust or humidity can affect sensor accuracy, so periodic checks are essential. Additionally, integrating solar heating requires understanding your local climate and sunlight patterns to maximize efficiency. Proper calibration ensures the sensors used are compatible with your system and support emissions regulations, which is vital for environmentally conscious gardening. By combining accurate sensor calibration with strategic solar heating management, your DIY Arduino climate controller will provide a more stable, energy-efficient environment for your plants. This approach empowers you to customize your greenhouse’s climate, reduce costs, and create a more sustainable growing operation—all with the power of simple, accessible technology.
Gasbye 4500 Sq.Ft. 2026 Energy Star Dehumidifier for Basement & Large Rooms with Drain Hose, Max 115 Pints/Day | 45dB Quiet Compressor | 1.7 Gal Water Tank | Auto Shut-Off & Restart, Black
- High Capacity Dehumidification: Up to 115 pints per day
- Large Coverage Area: 4500 sq ft capacity
- Quiet Operation: 45dB compressor noise level
As an affiliate, we earn on qualifying purchases.
Frequently Asked Questions
What Sensors Are Best for Monitoring Greenhouse Temperature and Humidity?
For monitoring greenhouse temperature and humidity, you want trustworthy sensors like DHT22 or BME280, which are easy to calibrate for accurate readings. These sensors support wireless communication, making it simple to integrate with your system. Proper sensor calibration ensures precise data, and wireless options let you monitor conditions remotely. Choose sensors that suit your setup, calibrate them regularly, and enjoy real-time updates for maximum greenhouse management.
How Do I Troubleshoot Connectivity Issues With Arduino in My Greenhouse?
When troubleshooting connectivity issues with your Arduino, start by checking your wireless troubleshooting steps, like ensuring your Wi-Fi module is properly connected and within range. Also, verify your power supply issues, making sure your Arduino and sensors are receiving consistent power. Reset your Arduino if needed, and double-check your code and connections. These steps help identify common problems and restore stable communication in your greenhouse setup.
Can I Integrate Solar Power With My Arduino Climate Controller?
You can definitely integrate solar power with your Arduino climate controller. By connecting solar panels, you generate renewable energy, reducing reliance on grid power. To guarantee consistent operation, include power storage like batteries, so your system runs smoothly during cloudy days or at night. Just make sure your solar setup supplies enough voltage and current for your controller and peripherals, and use a suitable charge controller to protect your batteries.
What Safety Precautions Should I Take When Working With Electronic Components Outdoors?
Think of electronic components outdoors as delicate flowers needing protection. You should prioritize electrical safety by wearing insulated gloves and working on a dry surface. Use weatherproofing techniques like sealing enclosures and waterproof connectors to prevent moisture damage. Keep power sources away from rain, and check connections regularly. These precautions make certain your project stays safe and functional, so you can enjoy your outdoor electronics without worry.
How Do I Program Custom Climate Control Algorithms for My Arduino System?
When programming custom climate control algorithms for your Arduino system, start with custom algorithm design that fits your greenhouse needs. Use sensors to gather data and define control parameters. Focus on parameter tuning to optimize performance, adjusting thresholds based on real-time feedback. Test your code thoroughly, observe how adjustments impact climate stability, and refine your algorithm iteratively for reliable, efficient climate management tailored to your environment.
Conclusion
Now that you’ve built your DIY Arduino climate controller, you’re truly revealing the secret to perfect greenhouse conditions. Imagine controlling your environment with the precision of a master scientist—your plants will thrive like never before. This project proves that with a little tech know-how, you can revolutionize your gardening game. Don’t just grow plants—ignite a green revolution in your own backyard. The future of gardening is in your hands, and it’s more powerful than you ever imagined.