
To guarantee you never forget to water your plants, build a DIY self-watering planter with a water reservoir at the bottom and wicking materials or float valves for automatic water delivery. Choose materials like plastic or glazed ceramic for better moisture retention and include drainage features to prevent overwatering. Regularly check the water level, but once set up, your plants will enjoy consistent hydration. Keep going to discover step-by-step tips to perfect your system.
Key Takeaways
- Incorporate a water reservoir at the container’s base to ensure consistent moisture supply.
- Use wicks or float valves for automatic water delivery, reducing manual watering frequency.
- Choose materials like plastic or glazed ceramic that retain moisture longer and support water regulation.
- Include drainage holes or gravel layers to prevent root rot and maintain healthy moisture levels.
- Regularly monitor water levels and refill the reservoir promptly to avoid drought stress.

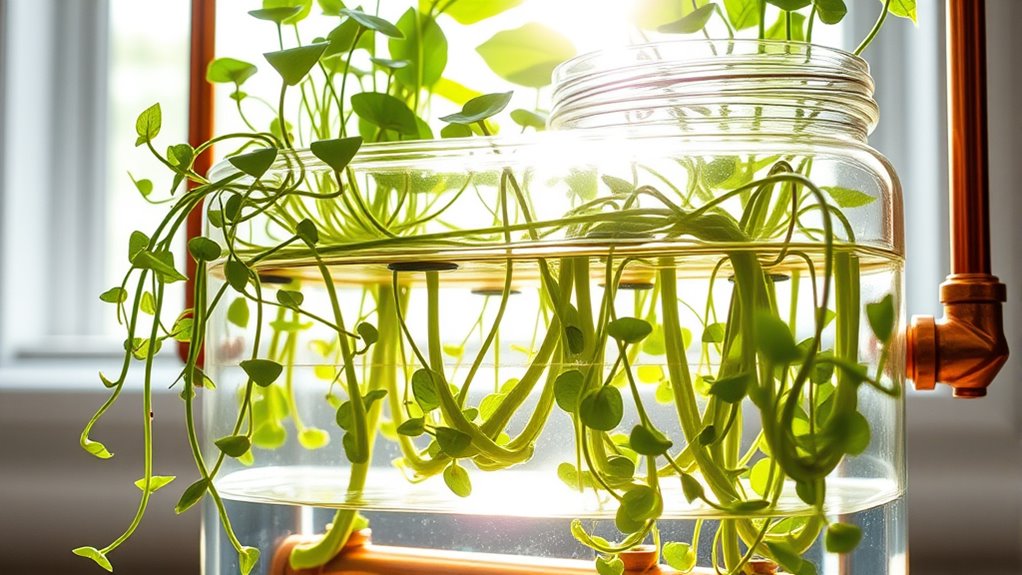
A DIY self-watering planter is a practical and cost-effective way to keep your plants healthy with less frequent watering. By designing your own system, you gain control over how much water your plants receive, reducing the risk of overwatering or underwatering. The key to success lies in understanding effective watering techniques and choosing the right planter materials. When creating your self-watering setup, consider how different materials influence water retention and plant health. For example, containers made from ceramic or terra cotta are porous, allowing excess moisture to evaporate and preventing root rot. Plastic planters, on the other hand, are less porous and retain moisture longer, making them suitable for plants that prefer consistently moist soil. Wooden planters can also work well, but ensure they’re treated or sealed to prevent rot and leaks.
Your watering techniques should focus on maintaining a consistent moisture level. With a self-watering system, you don’t have to water daily; instead, you fill the water reservoir periodically, and capillary action or wicking materials draw water into the soil as needed. To set this up, you’ll need a container with a water reservoir at the bottom, connected to the planting area above. You can use a simple wick made from cotton or nylon, which transfers water from the reservoir to the soil, or incorporate a reservoir that refills automatically through a float valve. The key is to ensure the water level stays steady and accessible to the roots, avoiding both drought stress and waterlogging.
Maintain consistent moisture levels by filling the reservoir and using wicks or float valves to water your plants automatically.
When selecting planter materials, think about durability, weight, and how the material interacts with water. For instance, if you want a lightweight option, plastic is ideal but may lack aesthetic appeal. For a more natural look, wood or clay are better choices, but they require some maintenance to prevent decay or cracking. Make sure your self-watering planter has adequate drainage to prevent excess water from stagnating around the roots, which can cause rot. Incorporate drainage holes into your design or use a layer of gravel at the bottom to improve airflow and prevent water from sitting in the bottom of the planter. Additionally, understanding the contrast ratio of your setup can help you optimize light and water conditions for healthier plant growth.
Incorporating these watering techniques and choosing appropriate planter materials will help you build a reliable, low-maintenance self-watering system. It allows you to enjoy healthy plants without the constant worry of forgetting to water. With some basic supplies and a bit of DIY ingenuity, you can create a system that keeps your plants thriving, saving you time and effort in your gardening routine.

GroBucket Self Watering Planter Insert w/LifeTested Technology, Water Reservoir & Level Indicator – Turn Any 5-Gal Bucket into a DIY, Portable Automatic Container Indoor-Outdoor Garden, 3-Pack
Turn Any 5-Gallon Bucket into a Self-Watering Planter: GroBucket is a planter insert designed for standard 5-gallon buckets,…
As an affiliate, we earn on qualifying purchases.
As an affiliate, we earn on qualifying purchases.
Frequently Asked Questions
How Often Should I Refill the Water Reservoir?
You should refill the water reservoir based on your plant’s watering schedule and reservoir capacity. Typically, check every few days, especially in warm weather or if you have thirsty plants. Keep an eye on the water level indicator, if available, and refill before it fully runs out. This way, your self-watering planter stays effective, ensuring your plants get consistent hydration without overwatering or forgetting to water.
Can This Planter Be Used Outdoors Year-Round?
While your self-watering planter offers a lovely touch to any garden, its outdoor durability depends on your climate. You might find it best to make seasonal adjustments, like bringing it inside during harsh winters or protecting it from extreme weather. With proper care, you can enjoy its benefits year-round outdoors, but be mindful of your area’s conditions to guarantee longevity and keep your plants thriving through every season.
What Types of Plants Are Best Suited for Self-Watering Planters?
When choosing plants for a self-watering planter, consider plant compatibility and soil requirements. Opt for plants that thrive in consistent moisture, like herbs, lettuce, or houseplants such as pothos and spider plants. Avoid plants that dislike wet roots, like succulents or cacti. These planters work best with plants that enjoy steady hydration and well-draining soil, ensuring healthy growth without overwatering.
Is There a Risk of Overwatering With This System?
Did you know overwatering is a common mistake in plant care? With a self-watering planter, there’s a small risk if you don’t monitor watering frequency, as it can lead to root rot. But, generally, these systems promote healthier plant growth by providing consistent moisture. To avoid overwatering and make certain plant health, check the water level regularly and adjust your watering schedule as needed.
How Do I Clean and Maintain the Planter?
To keep your self-watering planter in top shape, follow some simple cleaning tips and a maintenance checklist. Regularly remove any dead leaves or debris to prevent clogs, and rinse the water reservoir with mild soap and water every few weeks. Check the wicking system and ensure the float works properly. Keeping it clean and maintained prevents mold, algae, and ensures your plants stay healthy.

Automatic Plant Waterer Indoor Self Watering System for 15 Potted Plants, Auto Drip Irrigation Kit Programmable Water Timer with Smart Humidity Detection
Butler-grade watering system – You're unlocking the freedom to embark on journeys with your loved ones, cherishing moments…
As an affiliate, we earn on qualifying purchases.
As an affiliate, we earn on qualifying purchases.
Conclusion
Now that you’ve built your DIY self-watering planter, you’ll never forget to water your plants again—it’s as simple as setting it and forgetting it, much like a trusty Old World water clock. Just remember, a little upkeep keeps your greenery thriving. With this handy invention, you can enjoy lush, healthy plants without the fuss. So go ahead, embrace your inner gardener, and let your planter do the work while you relax, just like a Victorian lady with her parlor garden.

ORIMERC 30 feet 1/5 inch Self Watering Capillary Wicking Hydroponic Wick Cord Vacation Plant Sitter DIY Self-Watering Planter Pot Automatic Water System Device Potted Violet Auto Seedling Waterer Rope
DIY Vacation Self-watering System: Put the one end to a water source, this watering wick will transport water…
As an affiliate, we earn on qualifying purchases.
As an affiliate, we earn on qualifying purchases.
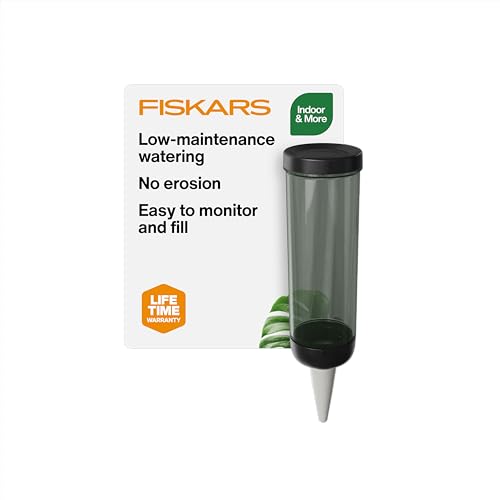
Fiskars LifeWell Watering Spike, Self-Watering System for Indoor Plants, Continuous Hydration Vacation Care & Travel, Porous Ceramic Cone Slow Release, 11.75 oz Capacity, Black
DECORATIVE AND FUNCTIONAL: Fiskars LifeWell Watering Spike keeps plants and flowers well watered even when you are away
As an affiliate, we earn on qualifying purchases.
As an affiliate, we earn on qualifying purchases.