Dreaming of biting into a juicy, sun-kissed cantaloupe fresh from your garden? You’re in for a treat! Growing these delectable melons is a rewarding journey, and understanding their growth stages is the key to a bountiful harvest. Let’s dive into the fascinating world of cantaloupe cultivation, step by step.
Stage 1: Planting Your Sweet Dreams
- Choosing the Perfect Seeds: Selecting the right cantaloupe seeds is crucial for a successful harvest. Look for high-quality seeds from reputable suppliers, and consider varieties known for disease resistance and adaptability to your local climate. Heirloom varieties offer unique flavors and textures, while hybrid varieties often boast improved vigor and disease resistance.
- Creating a Cozy Bed: Cantaloupes crave well-drained soil rich in organic matter. Aim for a soil pH of 6.0 to 6.5, as this slightly acidic environment promotes optimal nutrient uptake. Incorporate compost or well-rotted manure to enhance soil fertility and drainage. If your soil is heavy clay, consider adding sand or perlite to improve its texture.
- Planting with Care: Plant your cantaloupe seeds about 1 inch deep, ensuring they have good contact with the moist soil. Space the seeds 18-24 inches apart within rows, and allow ample space between rows (4-6 feet) for the vines to spread and bask in the sunlight. If you’re starting seeds indoors, sow them in peat pots or biodegradable containers 3-4 weeks before the last expected frost.
Pro Tips for Stage 1
- Timing is Key: Cantaloupes are warm-season crops, so plant them after the danger of frost has passed and the soil has warmed up.
- Soaking for Success: Soaking your seeds in lukewarm water for a few hours before planting can help speed up germination.
- Direct Sowing vs. Transplants: While cantaloupes can be transplanted, direct sowing is often preferred, as it minimizes transplant shock and encourages vigorous root development.
- Protect from Pests: Cover your newly planted seeds with row covers or netting to protect them from birds and other critters.
- Water Wisely: Keep the soil moist but not waterlogged, especially during germination and early seedling growth.
By carefully tending to your cantaloupe seeds and seedlings in this initial stage, you’ll set the stage for a bountiful harvest of juicy, flavorful melons.
Stage 2: Germination – Where the Magic Begins (7-10 Days)
This stage marks the exciting moment when your cantaloupe seeds awaken and embark on their journey towards fruit-bearing vines.
- Warmth and Moisture: Maintaining consistent warmth and moisture is essential for successful germination. Keep the soil temperature around 70°F (21°C), which provides the ideal environment for the seeds to sprout. Water the soil regularly, ensuring it remains moist but not overly saturated, as excess water can lead to rot or damping off.
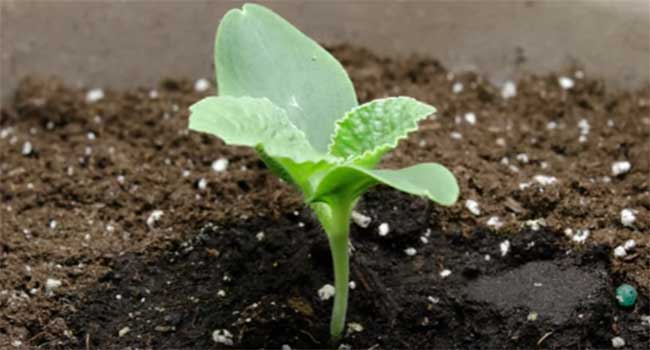
- First Signs of Life: After a week or so, you’ll witness the first signs of life as the seeds break dormancy. The initial leaves, known as cotyledons, will emerge, followed by the true leaves, which will have the characteristic shape of cantaloupe foliage. This is a thrilling moment for any gardener, as it signifies the beginning of your cantaloupe plants’ growth.
- Thinning the Herd: Once the seedlings have a few true leaves, it’s time to thin them out. Carefully remove weaker seedlings, leaving only the strongest and healthiest one in each planting hole. This ensures that the remaining plants have enough space and resources to thrive and reach their full potential.
Tips for Stage 2:
- Monitor Closely: Keep a close eye on your seedlings during this vulnerable stage, watching for signs of pests, diseases, or nutrient deficiencies.
- Provide Adequate Light: If starting seeds indoors, ensure they receive plenty of sunlight or supplemental grow lights to promote healthy growth.
- Avoid Overwatering: While consistent moisture is important, be careful not to overwater, as this can hinder root development and lead to fungal diseases.
- Be Patient: Germination can take anywhere from 7-10 days, depending on the variety and environmental conditions. Be patient and trust the process.
By providing the right conditions and care during this crucial germination stage, you’ll nurture your cantaloupe seedlings into robust young plants ready to take on the next phases of growth.

Stage 3: Vibrant Vine Growth Takes Over
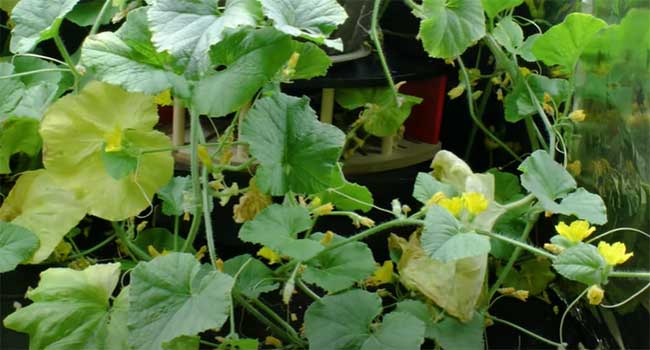
This stage is a testament to the vigorous growth potential of cantaloupe plants. Your once-tiny seedlings will transform into sprawling vines, showcasing their vibrant green foliage and preparing to set fruit.
- Spreading Their Wings: Cantaloupe vines are natural explorers, eager to stretch and expand their reach. Provide them ample space, approximately 3-4 square feet per plant, to accommodate their sprawling growth habit. This allows for proper air circulation, sunlight penetration, and overall plant health. Crowded vines can lead to stunted growth and increased susceptibility to diseases.
- Supporting the Climb: As the vines grow longer and heavier, they’ll benefit from some support. Utilize trellises, netting, or stakes to guide and support their upward journey. This not only keeps the vines organized but also elevates the developing fruits off the ground, preventing rot, pest damage, and soil-borne diseases. Additionally, it makes harvesting easier and more enjoyable!
- Mulch for Moisture: Applying a layer of organic mulch around the base of your plants is a game-changer. Mulch acts as a protective blanket, conserving soil moisture, suppressing weed growth, and regulating soil temperature. This creates a more stable and hospitable environment for the roots, promoting healthy vine development and fruit production.
Tips for Stage 3:
- Monitor Growth Regularly: Keep a close eye on the vines’ progress, adjusting support structures as needed and addressing any signs of stress or disease promptly.
- Water Deeply and Less Frequently: Encourage deep root growth by watering deeply and less frequently, allowing the soil to dry out slightly between waterings.
- Fertilize with Care: Provide a balanced fertilizer formulated for fruiting plants, following the package instructions. Avoid over-fertilizing, as this can lead to excessive foliage growth at the expense of fruit production.
- Pinch and Prune: To promote bushier growth and more fruit set, pinch back the tips of the main vines once they reach about 12-18 inches long.
By providing the right support and care during this stage of vibrant vine growth, you’ll create a thriving environment for your cantaloupe plants to flourish and prepare for the next exciting stage: flowering and fruit set.
Stage 4: Blossoms and Buzzing Bees (30-40 Days After Germination)
Get ready for a delightful spectacle as your cantaloupe plants burst into bloom, attracting a symphony of buzzing pollinators that will play a crucial role in your future harvest.
-
A Floral Symphony: Cantaloupe plants showcase two distinct types of flowers: male and female. Male flowers, known as staminate flowers, typically appear first, followed by the female flowers, or pistillate flowers, which are identifiable by a tiny, swollen ovary at their base. This miniature ovary holds the promise of developing into the juicy, flavorful cantaloupe you’ve been eagerly awaiting.
-
Pollination Power: Pollination is the magical process that enables fruit set. Attract a diverse array of pollinators, such as bees, butterflies, and other beneficial insects, by planting a variety of colorful, nectar-rich flowers near your cantaloupe patch. These winged visitors will be drawn to the blossoms, inadvertently transferring pollen from male to female flowers as they forage. If natural pollinators are scarce, you can play the role of matchmaker by gently transferring pollen with a soft brush or cotton swab. Carefully collect pollen from the male flowers and delicately apply it to the stigma of the female flowers.
Tips for Stage 4:
- Observe and Identify: Learn to distinguish between male and female flowers, paying close attention to the presence of the ovary on the female flowers.
- Provide Shelter and Water: Offer pollinators a welcoming habitat by providing sources of water, such as shallow dishes or birdbaths, and creating sheltered areas with native plants and shrubs.
- Avoid Pesticides: Minimize or eliminate the use of pesticides, especially during flowering, as they can harm pollinators and disrupt the delicate pollination process.
- Hand Pollination Tips: If hand-pollinating, do so in the morning when flowers are most receptive. Use a clean brush or cotton swab for each flower to prevent cross-contamination.
By fostering a pollinator-friendly environment and ensuring successful pollination, you’ll set the stage for a bountiful cantaloupe harvest in the weeks to come.

Stage 5: Fruitful Anticipation (35-45 Days After Germination)
The excitement builds as your cantaloupe plants enter a phase of rapid fruit development. Witness the transformation from delicate blossoms to promising young melons, while remaining vigilant in your care.
- From Flower to Fruit: Following successful pollination, the tiny ovaries of the female flowers will begin to swell and develop into miniature cantaloupes. This is a critical stage where consistent care is essential. Keep a watchful eye on your plants, monitoring for any signs of pests, diseases, or nutrient deficiencies. As the fruits grow heavier, provide additional support to prevent them from breaking off the vine.
- Pest Patrol: Stay vigilant for common cantaloupe pests, such as aphids, cucumber beetles, and powdery mildew. These unwelcome visitors can hinder fruit development and compromise the health of your plants. Opt for organic pest control solutions whenever possible, such as neem oil, insecticidal soap, or diatomaceous earth. These methods effectively manage pest populations while minimizing harm to beneficial insects and the environment.
- Hammock Time: As your cantaloupes grow larger and heavier, they may require a little extra support. Consider using fabric slings or hammocks to cradle the developing melons, preventing them from resting directly on the ground. This simple technique promotes air circulation around the fruits, reduces the risk of rot, and ensures even ripening.
Tips for Stage 5:
- Water Consistently: Maintain consistent soil moisture, especially during hot and dry weather, to support fruit development and prevent cracking.
- Monitor for Ripening Signs: As the cantaloupes approach maturity, watch for signs of ripening, such as a change in color, a softening of the blossom end, and a sweet aroma emanating from the fruit.
- Harvest at the Right Time: Cantaloupes are best harvested when they slip easily from the vine with a gentle twist. Avoid harvesting too early, as underripe melons lack flavor and sweetness.
By diligently tending to your plants and addressing any potential challenges during this stage of fruitful anticipation, you’ll be well on your way to enjoying a delicious harvest of homegrown cantaloupes.
Stage 6: The Sweet Reward – Harvesting Time!
After weeks of anticipation, the moment you’ve been waiting for has arrived: it’s time to harvest the fruits of your labor and savor the deliciousness of homegrown cantaloupes.
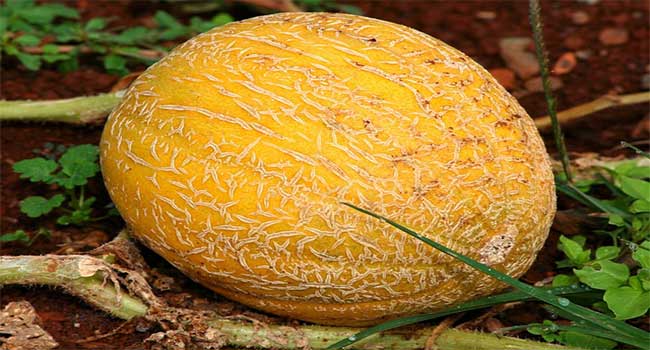
- Signs of Perfection: Determining the perfect moment to harvest your cantaloupes is crucial for optimal flavor and sweetness. Look for these telltale signs: the skin will turn a beautiful golden-beige color, a sweet, musky fragrance will fill the air, and the fruit will easily detach from the vine with a gentle twist. The stem end should also begin to crack slightly, indicating that the fruit is fully ripe and ready to be enjoyed.
- Harvesting with Care: When it’s time to harvest, use a clean, sharp knife or pruners to cut the stem, leaving a small piece attached to the fruit. Handle the cantaloupes gently to avoid bruising or damaging their delicate flesh.
- Savor the Flavor: Once harvested, your homegrown cantaloupes are ready to be enjoyed! Indulge in their juicy, flavorful flesh fresh from the vine, or store them in the refrigerator for up to a week. Cantaloupes are a versatile fruit that can be enjoyed in a variety of ways: sliced and eaten on their own, added to fruit salads, blended into smoothies, or used in creative culinary creations.
Tips for Stage 6:
- Check Regularly: Monitor your cantaloupes daily as they approach maturity, as ripe fruits can quickly become overripe.
- Don’t Rush: Resist the temptation to harvest too early. Allow the melons to fully ripen on the vine for maximum flavor and sweetness.
- Share the Bounty: If you have a surplus of cantaloupes, consider sharing them with friends, family, or neighbors. The joy of homegrown produce is best shared!
By following these tips and harvesting your cantaloupes at their peak ripeness, you’ll experience the ultimate reward for your gardening efforts: the sweet, succulent taste of success.
Pro Tips for Cantaloupe Connoisseurs
These insider tips will help you elevate your cantaloupe-growing game and achieve even more impressive results.
- Feed Your Plants: Provide your cantaloupe plants with the nourishment they need to thrive by using a balanced fertilizer formulated for fruiting plants. Apply the fertilizer every few weeks throughout the growing season, following the package instructions. This will ensure your plants have access to the essential nutrients required for vigorous growth and abundant fruit production.
- Water Wisely: Consistent moisture is crucial for cantaloupe success, especially during critical stages like fruit development. Water deeply and less frequently, allowing the soil to dry out slightly between waterings. This encourages deep root growth and prevents overwatering, which can lead to root rot and other fungal diseases.
- Rotate Crops: Crop rotation is a fundamental practice in sustainable gardening. Avoid planting cantaloupes in the same location year after year. Instead, rotate them with other crops, such as beans, peas, or corn. This helps break disease cycles and prevent the buildup of soil-borne pathogens that can affect cantaloupe plants.
Cantaloupe Varieties
| Cantaloupe Variety | Strengths | Considerations |
| Charentais | Small size, smooth gray-green skin, intensely sweet and aromatic orange flesh. | May prefer milder summers and well-drained soil. |
| Galia | Netted yellow-green rind, pale green flesh. Sweet, tropical flavor with hints of honeydew. Widely available. | Can be sensitive to extreme heat and humidity. |
| Piel de Sapo | Thick, green rind. Pale green flesh is firm, juicy, and refreshing with balanced sweetness. | May require a longer growing season and warm temperatures. |
| Hales Best Jumbo | Large, juicy melons with sweet, classic cantaloupe flavor. Adaptable to various climates. Good shelf life. | Can be susceptible to powdery mildew in humid conditions. |
| Ambrosia | Consistent quality, disease resistance, exceptional sweetness. Smooth, pale orange flesh with delicate aroma. | Sensitive to overwatering, may struggle in heavy clay soils. |
| Athena | High yields, excellent flavor. Deep orange flesh is firm and juicy with balanced sweetness. | May prefer warmer climates for optimal ripening. |
| Planters Jumbo | Large size, netted skin, sweet, juicy orange flesh. Performs well in warm climates. Good storage potential. | May not be well-suited to cooler climates or shorter growing seasons. |
| Early Dawn | Early-maturing, small to medium-sized melons with sweet, aromatic flavor. Ideal for shorter growing seasons. | May not produce as large a yield as some other varieties. |
| Gulfstream | Good disease resistance and tolerance to hot, humid weather. Produces medium-sized melons with sweet, orange flesh. | May require a longer growing season to reach full maturity. |

Your Cantaloupe Questions, Answered
Q: How long does it take to grow a cantaloupe?
A: Typically, 90-120 days from seed to harvest.
Q: How many melons can I expect per plant?
A: A healthy plant can produce 4-8 cantaloupes.
Q: Can I grow cantaloupes in containers?
A: Absolutely! Just choose a large container (at least 5 gallons) and provide sturdy support for the vines
Q: Why do the first blossoms on my cantaloupe plants drop off?
A: Don’t worry! The first flowers are usually male, and their role is to provide pollen. Female flowers, which develop later, have a small swelling at the base that will become the fruit after pollination.
Q: What causes poor fruit set and low yields in cantaloupes?
A: Several factors can contribute, including lack of pollination, extreme heat, or water stress. Ensure your plants are well-pollinated, adequately watered, and protected from excessive heat.
Q: How can I grow cantaloupes in a small garden?
A: Consider growing them vertically on a trellis or in containers to save space. Choose compact varieties specifically bred for smaller gardens.
Conclusion : Cantaloupe Growth Stages
As we’ve journeyed through the captivating life cycle of a cantaloupe, it’s clear that growing these succulent melons is a blend of art and science. With patience, care, and a touch of green-thumb magic, you’ll be rewarded with the sweetest, juiciest fruits your garden can offer.
Remember, every stage is an opportunity to connect with nature’s rhythms. From the first sprout to the final harvest, you’re nurturing not just a plant, but a delightful experience.
Now, armed with this knowledge, it’s your turn to embrace the joys of cantaloupe cultivation. Let your garden flourish, and may your harvests be abundant.

