To make DIY acoustic panels that look like art, choose materials like fabric-covered mineral wool or foam and incorporate vibrant colors, patterns, or custom artwork to match your decor. Shape them into rectangles, circles, or abstract forms, and mount them behind your mixing desk or along walls for effective sound control. Layer different textures and experiment with designs to optimize both style and sound absorption. Keep exploring to discover creative tips that will help you craft stunning, functional art pieces.
Key Takeaways
- Use vibrant fabrics, patterns, or custom artwork to create visually appealing panels that double as decorative art pieces.
- Choose decorative materials like fabric-wrapped mineral wool or recycled textiles for both sound absorption and aesthetic appeal.
- Design panels in various shapes and sizes to complement your decor and serve as statement art installations.
- Incorporate artistic finishes, such as metallic accents or LED lighting, to enhance visual interest and modern style.
- Mount panels creatively in strategic room locations to optimize soundproofing while adding a personalized artistic touch.
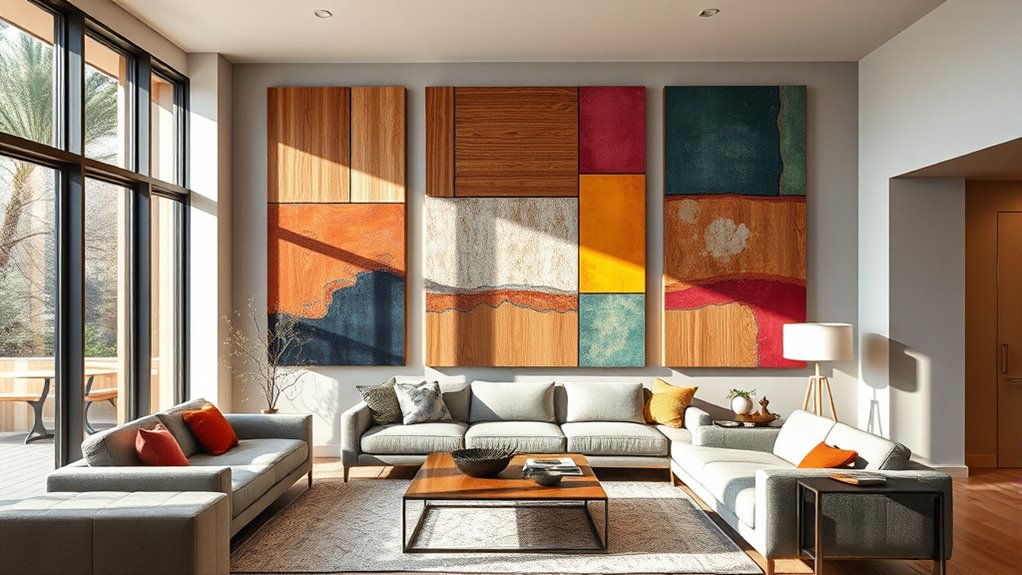
If you’re looking to improve your home or studio sound environment, DIY acoustic panels offer an affordable and customizable solution. Not only do they help control echoes and reverberations, but when designed creatively, they can also serve as eye-catching art pieces. Incorporating soundproofing techniques into your home studio design is crucial for achieving professional-quality sound, and these panels can be tailored to match your style while improving acoustics. Instead of plain foam or bulky panels, you can craft stylish, functional art that blends seamlessly with your decor, making your space both beautiful and practical.
DIY acoustic panels are a stylish, affordable way to enhance your space’s sound and aesthetics.
Start by selecting materials that balance sound absorption with aesthetic appeal. Common choices include fabric-wrapped mineral wool, foam, or recycled textiles. The key is to create panels that trap sound waves effectively while offering visual interest. Use vibrant colors, patterns, or even custom artwork to transform these panels into focal points. The process involves cutting your chosen material into desired shapes—rectangles, circles, or even abstract forms—and then wrapping them in decorative fabric. This way, your DIY acoustic panels don’t just dampen sound; they also showcase your personal style. When installing, consider strategic placement around your room—behind your mixing desk, along side walls, or on the ceiling—to optimize soundproofing techniques and enhance your home studio design.
Additionally, you can experiment with different textures and layering techniques to maximize sound absorption. Thick, dense materials work best for reducing low-frequency sound waves, while thinner layers can handle higher frequencies. Combining these layers creates a more all-encompassing soundproofing approach. Mounting options are flexible—use adhesive, hooks, or frames—so you can easily adjust your panels’ positioning as your room evolves. This adaptability ensures your acoustic treatment remains effective without sacrificing aesthetic appeal.
Making your own art-inspired acoustic panels also gives you control over size and shape, allowing you to fit your space perfectly. You can create large statement pieces or smaller accents that complement existing decor. Integrate LED lighting or metallic finishes for a modern look. The result is a custom acoustic treatment that looks like a piece of art but performs the crucial function of sound control. This approach not only elevates your home studio design but also provides a sense of pride in crafting something unique. When selecting materials, considering soundproofing techniques can significantly improve overall room acoustics and reduce unwanted noise. With a little effort and creativity, your DIY acoustic panels become both functional soundproofing tools and beautiful visual elements—an ideal combination for any audiophile or creative space.
As an affiliate, we earn on qualifying purchases.
Frequently Asked Questions
Can These Panels Be Customized With Personal Artwork?
Yes, you can customize these panels with your personal artwork. They offer various customization options, allowing you to showcase your favorite images, designs, or photos. You simply need to upload your artwork and follow the instructions provided by the manufacturer. This way, you create a unique, functional piece that reflects your style while improving sound quality. Personal artwork truly transforms these panels into one-of-a-kind decor pieces.
What Is the Best Fabric to Use for Art-Themed Panels?
For art-themed panels, you should choose fabric choices like tightly woven cotton or linen, which work well with printing and framing. Imagine customizing a home studio with a vibrant, textured linen that enhances both sound absorption and aesthetic appeal. Textile options like polyester blends also work well for durability and vivid prints. These fabrics balance sound quality and visual impact, making them ideal for your personalized, art-inspired acoustic panels.
Are DIY Panels Effective for Soundproofing in Large Rooms?
DIY panels can be effective for soundproofing in large rooms, especially if you focus on sound absorption and acoustic aesthetics. By strategically placing your art-inspired panels, you can reduce echo and improve overall sound quality. Use dense materials and proper mounting to maximize their effectiveness. While they may not fully soundproof, they substantially enhance the room’s acoustics, creating a more comfortable environment without sacrificing style.
How Long Do DIY Art Acoustic Panels Typically Last?
Ever wonder how long your DIY art acoustic panels will last? They typically endure 5-10 years, depending on panel maintenance and material durability. Regularly dust and inspect them to prolong their lifespan. Using high-quality, resilient materials like dense foam or treated fabrics boosts longevity. With proper care, your decorative panels can stay effective and visually appealing for years, making your investment both functional and stylish.
Can These Panels Be Easily Removed or Relocated?
Yes, these art-inspired acoustic panels can be easily removed or relocated. You simply need to carefully detach the mounting hardware or adhesive, depending on how you installed them. This makes panel removal and panel relocation straightforward, so you can adjust your room’s soundproofing or decor whenever needed. Just make certain you handle them gently to avoid damage during removal, and you’ll have no trouble repositioning your stylish acoustic art panels.
Conclusion
Now, imagine walking into a room where vibrant, art-inspired acoustic panels not only absorb sound but also catch your eye with their stunning designs. You’ve transformed plain walls into a gallery of creativity, balancing beauty and function effortlessly. With just a few simple steps, you’ve crafted a space that’s both stylish and acoustically inviting. Every glance at your DIY art panels reminds you that great design can be practical and personal—turning your space into a true masterpiece.